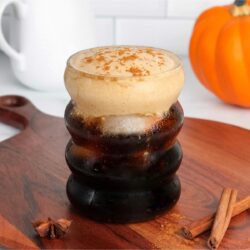
Dairy-Free Pumpkin Cream Cold Foam
By Chloe MartinGive your coffee a cozy, fall-inspired twist with this dairy-free pumpkin cream cold foam. It's lusciously creamy, filled with warm pumpkin spice flavors, and comes together in minutes — plus it makes enough to enjoy all week long. Just pour it over iced cold brew for a pumpkin cream cold brew that’s even better than Starbucks.
Ingredients
Pumpkin Cream Cold Foam (Makes 8 Servings)
- 1 cup dairy-free heavy cream (see notes for substitution)
- ½ cup sweetened condensed coconut milk (or maple syrup)
- ½ cup pumpkin puree
- 2 teaspoons vanilla extract
- 2 teaspoons pumpkin pie spice
- 1 teaspoon cinnamon
For 1 Pumpkin Cream Cold Brew Drink
- 6-8 ounces cold brew coffee (or coffee/latte of choice)
- handful of ice cubes
Instructions
- In a blender, combine dairy-free heavy cream, sweetened condensed coconut milk, pumpkin puree, vanilla, pumpkin pie spice, and cinnamon. Blend until creamy and thick. Alternatively, add all the ingredients to a mixing bowl and use a hand mixer to achieve the same smooth, thick consistency.
- To make a pumpkin cream cold brew drink, add a handful of ice to a glass and pour in your cold brew or (coffee of choice), leaving about an inch from the top.
- Pour or spoon about 4-6 tablespoons of cold foam on top. Finish with a sprinkle of cinnamon and enjoy!
Notes
Yield: This recipe makes about 3 cups of cold foam (8 servings of 6 tablespoons each).
Dairy-free heavy cream substitute: Use canned full-fat coconut milk instead. Be sure to shake the can first to mix the liquid and cream. Room temperature works best — chilled coconut milk can sometimes become grainy when blended. Light coconut milk can also work, but the cold foam won’t be as thick.
Storage: Store leftover cold foam in an airtight container or mason jar in the fridge for up to 1 week.
Did you make this recipe?Leave a comment below and tag @chloescreativekitchen!